(gentle relaxing music) – Hi, I’m Dr. Steve Ridley. I use the AxoTrack Needle Guiding System for all of my central lines. And I’ve developed some techniques that I would like to share with you. I hope you will find them helpful. One of the primary benefits of the AxoTrack device is that it enables the performance of an ultrasound guided, subclavian central line placement. Here, I will show you how I perform this procedure. To begin a procedure, assemble the transducer and sterile shield from the AxoTrack I Procedure Kit, and pre-load the needle into the integral needle guide. Start pre-loading the needle by rotating the needle clamp fully forward with your thumb to the open position such that the needle guide opening is unobstructed. Then, place the magnet against the proximal end of the magnet rail to stabilize the needle as you move the needle tip into alignment with the needle guide opening. To maintain needle sharpness, avoid hitting the needle tip against any surface, as it is pre-loaded into the needle guide. With the needle in the guide, move the needle forward and backward. As you do this, confirm the needle movement is mirrored by the virtual needle movement on the sonogram.
Now, move the needle until its tip is just protruding from the base of the sterile shield, and confirm on the sonogram that the virtual tip is visible at the top of the sonogram. Observing that needle movement is synchronized and that the virtual needle tip is properly located on the sonogram confirms that the system is ready for use. At this point, retract the needle slowly until the virtual needle just barely disappears from the sonogram. Then secure the needle in place by rotating the needle clamp backward with your thumb to the closed position. Check to be sure that the needle tip is not protruding from the bottom of the sterile shield. Hold continuous gentle pressure on the needle clamp to maintain the needle in its safe, retracted position during patient scanning and until you are ready to advance the needle toward its target. Now, I will show on our model and example of how I perform a subclavian central line using AxoTrack. To begin, it is often helpful to re-position the patient’s arm to find the best view of the subclavian vein.
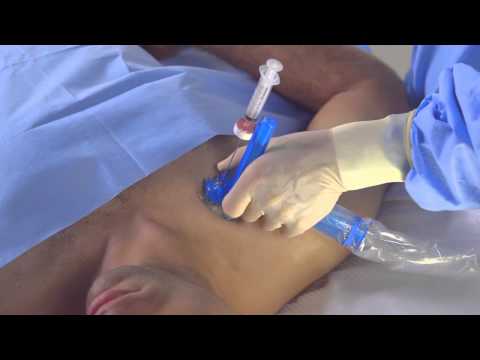
A good starting point is with the patient’s arm in the throwing position. Apply a liberal amount of sterile gel and place the probe at the angle of the clavicle and point underneath the clavicle. While still maintaining gentle pressure on the needle clamp, scan back and forth to find the subclavian artery, and medial to that, the subclavian vein. Adjust the patient’s arm until the best view of the subclavian vein is obtained. Observe that deep to the subclavian artery and vein, the pleura appears as a bright, linear streak. Align the onscreen target line with the subclavian vein, and prepare to advance the needle. Note that until the needle tip penetrates the skin, you may need to increase pressure with the probe to prevent image loss. However, once the skin is penetrated, you can let off pressure and proceed to advance the needle while observing the virtual needle as it approaches the vein.
Hold the needle assembly and syringe approximately as shown. Then release the needle by rotating the needle clamp fully forward with the thumb to the open position. Advance the needle to the vein, while keeping the magnet against the magnet rail. As the anterior wall of the vein deflects under the pressure of the needle tip, slow down and while pulling back on the syringe plunger, gently pierce the vessel. The anterior wall will spring back once it is punctured, which is confirmed by blood flash in the syringe. Now, adjust the needle tip so that it is in the upper half of the lumen, and actuate the needle clamp to secure the needle tip in place. While holding pressure on the needle clamp, pop the syringe off the needle by pinching the space between the syringe and the needle hub. Check that the needle bevel is facing up, and with the open side of the J of the guidewire also facing up, advance the guidewire. The guidewire entering the vein can often be observed in real time on the sonogram.
While maintaining gentle pressure on the needle clamp, withdraw the probe and needle over the guidewire, gripping the guidewire between the thumb and first or second finger. Once the needle tip clears the skin’s surface, continue with the Seldinger technique. (gentle relaxing music).