– [Voiceover] Hi, I’m Dr. Steve Ridley. I use the AxoTrack needle guidance system for all of my central lines, and I’ve developed some techniques that I would like to share with you. I hope you will find them helpful. One of the challenges of performing an internal jugular vein catheterization is that the vessel is very collapsible, and real care has to be taken to prevent back-walling the vein, especially in a patient that has low central venous pressure. AxoTrack helps overcome this challenge by providing precise guidance of the needle trajectory and visualization of the needle tip and vein interaction. To begin a procedure, assemble the transducer and sterile shield from the AxoTrack one procedure kit and pre-load the needle into the integral needle guide. Start pre-loading the needle by rotating the needle clamp fully forward with your thumb to the open position such that the needle guide opening is unobstructed.
Then place the magnet against the proximal end of the magnet rail to stabilize the needle as you move the needle tip into alignment with the needle guide opening. To maintain needle sharpness, avoid hitting the needle tip against any surface as it is pre-loaded into the needle guide. With the needle in the guide, move the needle forward and backward. As you do this, confirm the needle movement is mirrored by the virtual needle movement on the sonogram. Now, move the needle until its tip is just protruding from the base of the sterile shield and confirm on the sonogram that the virtual tip is visible at the top of the sonogram. Observing that needle movement is synchronized and that the virtual needle tip is properly located on the sonogram confirms that the system is ready for use.
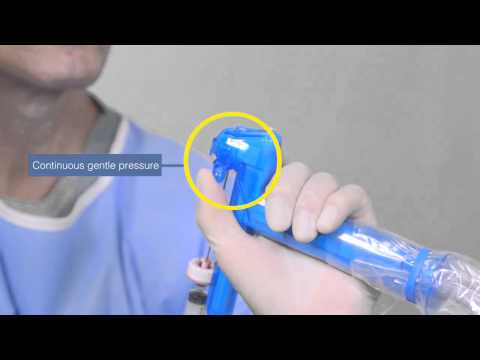
At this point, retract the needle slowly until the virtual needle just barely disappears from the sonogram. Then secure the needle in place by rotating the needle clamp backward with your thumb to the closed position. Check to be sure that the needle tip is not protruding from the bottom of the sterile shield. Hold continuous gentle pressure on the needle clamp to maintain the needle in its safe retracted position during patient scanning and until you are ready to advance the needle toward its target. Now I will show you on our model how I perform an internal jugular vein central line using AxoTrack. With the patient optimally positioned, apply a liberal amount of sterile gel and place the probe over the internal jugular vein. While maintaining gentle pressure on the needle clamp, align the on-screen target line with the internal jugular vein on the sonogram. Angle or tip the probe about 30 degrees downstream. Hold the needle assembly and syringe approximately as shown. Release the needle by rotating the needle clamp fully forward with the thumb to the open position, and prepare to advance the needle.
Note that it may be necessary to apply extra pressure with the probe as the needle penetrates the skin to avoid losing the ultrasound image. The extra pressure can cause the IJ to temporarily flatten out, but you will still be able to see the important adjacent structures. Once the skin has been penetrated and the extra pressure applied to the probe has been relieved, the IJ will re-fill and be visible. Then you can confirm that the target line is still located at the desired position on the vein and continue with the procedure. Here’s a look at a sonogram from an actual procedure. The needle tip has been secured inside the sterile shield by continuous gentle pressure on the needle clamp during the scanning process. The on-screen target line is aligned with the internal jugular vein and the probe is angled about 30 degrees downstream.
The needle clamp is then released and the needle advanced until it penetrates the skin. Remember, it may be necessary to add pressure with the probe until the skin is penetrated by the needle to prevent image loss. Notice that the extra pressure causes the vein to flatten out. Once the skin has been penetrated, the extra pressure applied with the probe is relieved and the vein re-fills and is visible. The target line is confirmed to still be located at the desired position on the vein.
The needle is further advanced to the vein under observation. The anterior wall of the vein may deflect or even fully collapse under the pressure of the needle tip. If this happens, slow down and gently add pressure until the vessel is pierced. The anterior wall will spring back once it is punctured, which can be confirmed by blood flash in the syringe. The position of the needle tip is adjusted if necessary so that it is in the upper half of the lumen and the needle clamp is actuated to secure the needle tip in place. While maintaining gentle pressure on the needle clamp, the syringe is popped off of the needle and the needle bevel position is checked to be up. With the open side of the J of the guide wire also facing up, the guide wire is advanced into the vein. The guide wire entering the vein can often be observed in real time on the sonogram. While holding continuous gentle pressure on the needle clamp, withdraw the probe and needle over the guide wire, gripping the guide wire between the thumb and first or second finger, once the needle tip clears the skin surface. Continue with your Seldinger technique.
There will be times that the central venous pressure will be so low that the internal jugular vein will simply remain flat after the pressure of the probe is let off. In that situation, I recommend moving to the supraclavicular approach that I describe in another video..