– Hello, my name is Phil Perera and I’m the Emergency Ultrasound Coordinator at the New York Presbyterian Hospital in New York City. And welcome to SoundBytes Cases. In this SoundBytes module, we’re going to look specifically at the use of Bedside Ultrasound to detect Pleural Fluid. Interestingly enough, Ultrasound has been found to detect as little as 20 ccs of fluid within the Pleural Space. In contrast, a Chest X-Ray will not reliably pick up less than 100 to 150 ccs of fluid on an AP Film. Now this problem is only compounded in the Supine Trauma Patient, where a Chest X-ray may miss a significant amount of fluid as a Hemothorax will layer out Posteriorly and can be very difficult to detect on this film.
For these reasons, Bedside Ultrasound may offer a more accurate way of diagnosing Pleural Fluid. Here’s a slide reviewing how to perform the Ultrasound examination for detection of Pleural Effusions. Optimally you’ll have a three megahertz probe with a small footprint that can easily sit between the ribs as we’ll be looking into the Right Upper Quadrant and Left Upper Quadrant areas. In position one, we’ll be coming into the standard Right Upper Quadrant Trauma FAST exam and position the probe into that area just above the Liver and below the Diaphragm. We can then angle the probe upwards into the Thoracic Cavity to look for a Dark or Anechoic Fluid Collection signifying Thoracic Fluid.
Position:61% We can repeat the exam in the left side as shown in probe position two. Placing the probe into that area of the Left Upper Quadrant Trauma FAST view. Look first into the area above the Spleen and below the Diaphragm and then angle the probe upwards into the left Thoracic Cavity. If fluid is seen with in the Thoracic Cavity, we can then move the probe upwards to investigate the extent of the Effusion. Here’s a video going over how to perform the examination. Notice here, we have a probe placed into the Right Upper Quadrant Trauma FAST area. Notice that we’re angling the probe upwards into the Thoracic Cavity to fully investigate for a Pleural Effusion. Here, I’m just superimposing about the level of the Diaphragm as shown in the red marker. And notice here that the probe is positioned coming into that area just above the Diaphragm into the Thoracic Cavity.
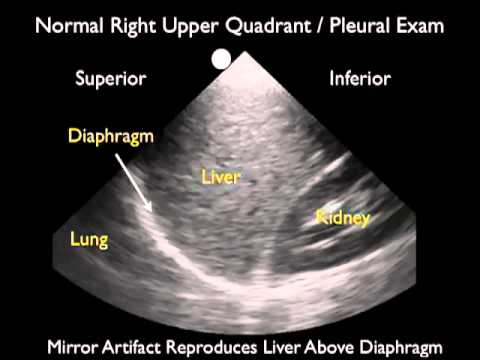
Traditionally, the probe should be in a long-axis configuration with the marker dot towards the patient’s head. Again, if a Fluid Collection is seen, one can then move the probe upwards to fully investigate how big the Effusion is. To optimize your examination, place the patient with the head slightly upwards, so that the fluid will layer out above the Diaphragm allowing earlier detection of smaller amounts of fluid. Now that we know how to perform the Ultrasound examination for Pleural Fluid, let’s take a look at a normal Right Upper Quadrant Pleural Examination. The probe is configured at a long-axis type orientation with the marker towards the patient’s head. So, we see Superior to the left, Inferior to the right. The Liver is in the middle of the image. And let’s look above the liver. Here we see the Diaphragm, that curving, white line which is moving up and down as the patient breathes. And to the left or Superior to the Diaphragm is the Thoracic Cavity. Now, while looking at the Thoracic Cavity here, what we see is something called Mirror Artifact. This occurs as a result of the sound waves coming through the Diaphragm and reproducing what looks like a mirror image of the Liver within the chest.
This is a normal appearance of the Thoracic Cavity and Mirror Artifact is something that will be seen commonly on Bedside Sonography. Notice, however, the absence of a Dark or Anechoic Fluid Collection within the right chest. Now, let’s take a look at a normal Left Upper Quadrant Pleural Exam. Again, we’re in a long-axis configuration, so Superior to the left, Inferior to the right. We see the Spleen in the middle of the image and we see the Diaphragm moving up and down as the patient breathes. Let’s look above the Diaphragm into the Thoracic Cavity. And, again, we see that Mirror Artifact. What it looks like is almost like reproduction of the Spleen within the Thoracic Cavity. So, this is a normal finding.
And one that is not to be confused with fluid. Fluid will appear very differently and will have the appearance of a Dark or Anechoic stripe right above the Diaphragm. Here’s an illustration showing a positive examination from the Right Upper Quadrant view with a Pleural Effusion above the Diaphragm. We’re in that long-axis configuration, so Superior to the left, Inferior to the right. We see the Liver in the middle of the image here. And the Diaphragm, the white line as seen right above the Liver. Notice in this image we have a Pleural Effusion as represented by the Dark area of fluid, which is immediately Superior to the Diaphragm and tucks in there right above the Diaphragm going up into the Thoracic Cavity. So, this will the signature finding of a Pleural Effusion as taken from the Trauma FAST Views, from the Right Upper Quadrant.
And the Left Upper Quadrant will also have a similar view, although we’re just looking above the Spleen in that orientation. Here’s a video clip showing a Small Pleural Effusion as taken from the Left Upper Quadrant view. Here, we see the Spleen in the middle of the image, the Kidney Inferior to the Spleen. And the Diaphragm, the curving white line that’s moving up and down as the patient breathes right above the Spleen. As we look into that area above the Diaphragm, we actually appreciate here, the presence of a Dark or Anechoic Fluid Collection above the Diaphragm.
This represents a positive Pleural Effusion. Notice that the amount of fluid is relatively small and we can actually see the Lung moving up and down to the left of the image here. Here’s a Moderate Plural Effusion as taken from the Right Upper Quadrant View. We see the Liver to the Inferior Aspect or to the right. The curving white line making up the Diaphragm in the middle of the image. And fluid representing a Pleural Effusion Superior to the Diaphragm. Interestingly enough, we see the Lung moving around and all the fluid compressed down by the fluid within the chest cavity taking on what appears to like a Liver within the chest. And something called Hepatization of the Lung. And this is commonly seen with a Pleural Effusion, as it pushes in on the Lung making it more of a solid-type organ.
Position:63% Here’s a Large Pleural Effusion as taken from the Right Upper Quadrant View. And what we see here, is the Liver Inferiorly, the Diaphragm right above the Liver there in the middle of the image. And we see a large Dark or Anechoic Collection immediately Superior to the Diaphragm. This represents a Large Pleural Effusion. And in the midst of the Pleural Effusion, we can see the Lung waving around and compressed down by all the fluid within the Thoracic Cavity. Again, demonstrating that Hepatization of the Lung as it’s compressed down by the Pleural Fluid. So, this would be a Large Plural Effusion, as there’s a large amount of fluid both Inferiorly between the Lung and the Diaphragm. And both Anterior and Posterior to the Lung itself here. Unfortunately, not all Plural Effusions will be free-flowing or uncomplicated. There are occasions where our patients can have repeated Pleural Effusion that can be Loculated or Complicated.
Here we see an example of a Loculated Pleural Effusion. Notice this Lung here has an attachment with a Fibrin area that attaches it or glues it onto the Diaphragm Inferiorly. Therefore, we have two Loculated areas Effusion, both Anterior to the top of the screen and Posterior. As the Lung is trapped within the Thoracic Cavity by this Fibrinous Attachment to the Diaphragm, it may be dangerous to perform an invasive procedure like a Thoracentesis or a Chest Tube Placement. The needle or the Chest Tube could be guided up into the Lung causing a Pneumothorax by the Fibrinous Attachment to the Diaphragm. So, in conclusion, I’m glad I could share with you this SoundBytes module going over the Ultrasound Examination for the detection of Pleural Fluid. As we’ve discussed earlier in the module, Ultrasound may be more accurate in detection of Pleural Fluid than a Chest X-ray. And Ultrasound allows easy grading of the amount of fluid within the Pleural Cavity. It can also detect Complicated Pleural Effusions that may be Loculated and can help determine which patients may benefit from a Drainage Procedure such as a Thoracentesis or a Tube Thoracostomy.
So, I hope to see you back as SoundBytes continues and in further modules, we’ll actually look closer at the Thoracentesis Procedure under Ultrasound guidance..