– [Voiceover] This is Dr. Phil Perera and welcome to SoundBytes. In this module we’re gonna go over how to use ultrasound to guide us for the supraclavicular subclavian vein cannulation. The supraclavicular approach to the subclavian vein is a great alternative to the traditional infraclavicular approach that’s been emphasized over the years in medical and surgical training. For this approach, the catheter is placed into the subclavian vein above the clavicle either very close to, or at the junction with the internal jugular vein at the confluence of the brachiocephalic vein. Advantages of this approach include a relatively short distance to the vein and less wire kinking than with the infraclavicular approach. A nice article that goes over this approach was in the Western Journal of Emergency Medicine in 2009 by the authors listed below in the reference. Let’s take a moment to review the upper extremity venous anatomy that we’ll need to know to perform supraclavicular subclavian cannulation. The first landmark is the clavicle, and remember, as the subclavian vein passes lateral to the clavicle it becomes the axillary vein. We can see the subclavian artery and vein running above and below the clavicle. We can also see the internal jugular vein and carotid artery going up and down the neck.
We can see the confluence of the internal jugular vein and the subclavian vein to form the brachiocephalic veins. In effect, we’re aiming at the confluence here, the brachiocephalic vein for placement of the catheter. And we can see that the brachiocephalic veins join to become the superior vena cava going into the right atrium. And that’s where we want to place the tip of the catheter. Now let’s take a look at the essential anatomy from a lateral approach. We again note the clavicle here forming the boundary between the subclavian artery and vein and the axillary artery and vein. We see the subclavian artery and vein arching above and below the clavicle. And we see the internal jugular vein and carotid artery going up and down the neck. Notice again the confluence of the subclavian vein and the internal jugular vein at the brachiocephalic vein. And again, that’s where we’ll be aiming with our needle. Notice the brachiocephalic vein joining in the superior vena cava and down into the heart. Now let’s take a moment to talk about ultrasound guidance for this approach to the subclavian vein. Traditionally it’s been thought to be difficult to image this portion of the subclavian vein as it arches above the clavicle.
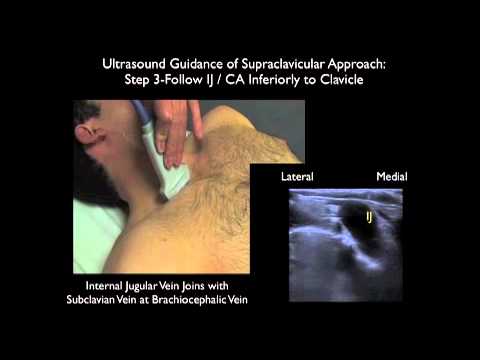
However, the supraclavicular portion of the subclavian vein can be well visualized by placing the ultrasound probe in a medial position just above the clavicle and angling it down into the chest. To visual the subclavian vein just anterior to the subclavian artery. In this illustration, we see the probe placed above the subclavian vein able to image it in a long axis orientation. For this application we’ll want to use the high frequency 10 megahertz linear array type probe. And notice that we have the probe angled anterior to pick up the vein which will be located anterior to the subclavian artery. Thus, cannulation of the vessel will be performed in a long axis approach using ultrasound guidance. An alternative approach to find the subclavian vein and the brachiocephalic vein is to follow the internal jugular vein inferiorly down the neck.
We then will visualize the subclavian vein as it joins with the internal jugular vein at the confluence of the brachiocephalic vein. And we can use color Doppler flow imaging as shown in the video box to the upper right to differentiate vein from artery. Notice the characteristic pulsations of the artery versus the constant phasic respiratory hum of the vein. To use ultrasound guidance for the supraclavicular approach we’ll want to place the probe in a long axis orientation in the supraclavicular fossa. As noted here in the picture to the upper right, we can see the probe placed over the top of the clavicle.
There’s not a lot of space in the supraclavicular fossa and that’s why it’s easier to place the probe in a long axis orientation rather than a short axis approach. We’ll be using the high frequency linear array type probe for this application and because we want to use dynamic or real time guidance, we’re going to use a sterile sheath over the probe. Now let’s go over how to use ultrasound to visualize the subclavian vein. We’ll begin by running the probe down the neck to identify the internal jugular vein lateral to the carotid artery.
We can push down with the probe to differentiate vein from artery as the vein should completely compress as long as there’s no thrombosis present. We can also use Doppler flow to differentiate the two vessels. After we identify the internal jugular vein within the neck we’ll run the probe even further inferiorly down the neck and angle it down into the chest. Now, note here that we’re seeing the subclavian artery and the carotid artery and the confluence of the two vessels. And remember that the subclavian artery is going to be located posterior to the subclavian vein. Next we’re gonna orient the probe even more anteriorly watching internal jugular vein go down into the chest and join with the subclavian vein at the confluence of the brachiocephalic vein.
And we remember that the subclavian vein will be located more anteriorly than the subclavian artery. Now let’s take a look at some ultrasound images showing the internal jugular vein running down the neck and joining with the subclavian vein at the brachiocephalic confluence. And we can see the subclavian vein arching from the lateral aspect to the left of the image, here, and joining with the brachiocephalic vein medially. Again, we’ll be aiming the needle for the confluence of the subclavian vein down with the brachiocephalic vein. Now we can that the structure is relatively superficial, we can see the depth markers over to the right, and we note that the subclavian vein is only at about one centimeter depth.
In this ultrasound image we first locate the internal jugular vein and then we orient the probe a little bit more anteriorly to pick up that subclavian vein and the confluence of the brachiocephalic vein. So all we’re doing is a slight tilt anteriorly with the probe to visualize the subclavian vein running into the brachiocephalic vein. And again, we can see the depth markers over to the right there, and we notice that the subclavian vein is located at about one to two centimeters. So again, it’s a relatively superficial structure. In this ultrasound image we see the subclavian vein coming from lateral to the left of the screen and joining with the brachiocephalic vein medially. We can see a valve at the confluence between the two structures. Our needle would come in from the lateral aspect and be aimed medially towards that confluence and we can see that it would have to come down about two centimeters to successfully cannulate the vessel. In this illustration we’ll go over the surface anatomy for the supraclavicular subclavian vein cannulation. The needle should be aimed towards the subclavian vein at the confluence of the internal jugular vein into the brachiocephalic vein.
Generally we’re gonna place the needle up the back of the clavicular head of the sternocleidomastoid. The needle should be aimed towards the sternal notch. And again, it’s a relatively superficial stick. This video reviews the middle triangle of the neck as framed by the divisions of the sternocleidomastoid muscle. Remember that the sternal head will run medial and the clavicular head will run lateral. The clavicle will form the inferior boundary of the middle triangle of the neck. And we can see the index finger placed within the middle triangle. Within this triangle will run the internal jugular vein and the carotid artery. And that’s where we want to be first locating with the probe the internal jugular vein as it runs down the neck. Here are the traditional surface landmarks for cannulation of the supraclavicular subclavian vein. We want to identify the clavicular head of the sternocleidomastoid laterally and that’s generally where we’ll be placing our needle. The needle will be aimed towards the sternal notch medially. And we can see that the needle will be coming over the top of the clavicle aimed into the subclavian vein.
And this video clip will simulate the correct placement of the needle for cannulation of the subclavian vein above the clavicle. Here I’m just illustrating where the subclavian vein should be running from lateral to medial. And note here, we’ll place the needle just lateral to the clavicular head of the sternocleidomastoid with an orientation towards the sternal notch of the sternum. Next we’ll add ultrasound into the mix and here we’re placing the high frequency linear array probe into the supraclavicular fossa, just above the subclavian vein. So we’d be placing the needle on the lateral aspect of the probe so that we can watch the needle come down into the vessel. And again, I’m just emphasizing the standard trajectory of the needle from that lateral aspect of the clavicular head of the sternocleidomastoid towards the sternal notch. Here we get a different perspective for the placement of the probe in the long axis configuration in the supraclavicular fossa. And we see here that that needle should be oriented off the back of the probe or lateral to the probe.
We’ll be placing the needle directly underneath the probe so we can watch it all times as it goes down to the vessel to correctly cannulate the subclavian vein. And the needle should be aimed towards that sternal notch. Here we’re going to successfully cannulate the subclavian vein using the long axis approach under ultrasound guidance. And we can see the needle coming in from lateral to medial successfully cannulating the subclavian vein. Notice that the needle has a bright or echogenic appearance on ultrasound. Here we’ll stop the video clip and we can see the tip of the needle centered within the subclavian vein. We’ll note the depth markers over to the right of the ultrasound image, here, and we can see that the subclavian vein is at about one to two centimeters. And we need to keep this in mind as the dome of the lung is relatively close to the subclavian and we want to keep that tip of the needle relatively superficial.
Once we’ve had a successful cannulation of the vessel we can actually guide the guide-wire using ultrasound guidance. This is helpful as we want to make sure that the guide-wire passes without obstruction down into the vessel lumen. In this video clip we can actually see the guide-wire advance through the catheter into the subclavian vein laterally and being pushed down the subclavian vein into the confluence with the brachiocephalic vein medial and to the right. Next we can watch as the guide-wires further advance down the brachiocephalic vein into the superior vena cava. And here we can see the echogenic guide-wire coming from left down the subclavian into the brachiocephalic and into the superior vena cava.
And remember that we want to position the tip of the guide-wire and then the resulting catheter within the superior vena cava so that it doesn’t enter into the right atrium. To summarize some of the important parts of this module I want to emphasize that the supraclavicular approach to subclavian vein is a great alternative to the traditional infracavicular approach and one in which ultrasound guidance can be used dynamically or real time to guide the needle down into the vein, hopefully to decrease the risk of complications to our patient during the procedure.
As we discussed, the subclavian vein cannulation is performed with the ultrasound probe held in the long axis orientation in the supraclavicular fossa so that the needle will enter off the back of the probe laterally and be advanced in a long axis view down into the vein. Let’s finish here with a discussion of some of the potential complications of this approach, the first of which is inadvertent pneumothorax. Now the subclavian vein is relatively close to the lung, the dome of the lung, and for that reason, we’ll traditionally go on the right side where the right side of the lung is a little lower at the dome than on the left side. We could actually visualize the dome of the lung on ultrasound as seen in the video box to the upper right. We can see the pleural surfaces moving back and forth as the patient breathes and this is called lung sliding. So we can visualize the lung and avoid it. We want to avoid deep punctures with the needle and keep that needle tip visualized at all times as we advance it down into the vein.
The second potential complication is inadvertent puncture of the subclavian artery during the cannulation procedure. Remember that the subclavian vein lies anterior to the subclavian artery and we can actually identify both structures prior to puncture attempts using ultrasound. We can use color flow Doppler imaging to differentiate the artery from the vein and as seen in the mini boxes to the upper part of the video here, we can see to the left the pulsations within the subclavian artery and the venous hum to the right, there, within the subclavian vein.
We want to aim that needle anteriorly at all times to avoid the subclavian artery so as not to inadvertently puncture it during the cannulation procedure. So while it’s important to discuss the potential complications of this approach, I feel that this is a great line in clinical use and one that’s actually better or safer for our patients than the traditional blind landmark-based infraclavicular approach to the subclavian vein. So I hope it’s something that you’ll give a try in the clinical areas using ultrasound guidance.
And I look forward to seeing you back in the future as SoundBytes continues..