– Hello, my name is Phil Perera and I’m the emergency ultrasound coordinator at the New York Presbyterian Hospital in New York City and welcome to Soundbytes Cases. In this Soundbytes module entitled part two of Ultrasound Guided Central Venous Access we’ll look further onto the use of bedside ultrasound to make a more precise puncture attempt on the internal jugular vein during central venous cannulation. As we discussed in part one, we first wanna map out the anatomy of the internal jugular vein by orienting the probe in both short and long axis configurations to fully investigate the orientation of the vessel. We want to use the dynamic technique for real time guidance of the needle into the vein lumen and for this we’ll need to place the probe into a sterile sheath barrier to observe sterile precautions during the puncture attempt. Here’s the needle coming in underneath the probe in a short axis configuration.
Notice that the sheath needle is coming in underneath the probe at a 45-degree angle. And notice that we’re using the sheath needle to first determine the location of the internal jugular vein by the ring down artifact. We would use the same approach for the cannulating needle coming in underneath the probe at a 45-degree angle. As we discussed prior, the probe should be oriented in a side-to-side orientation with the marker down towards our left as we stand at the head of the bed so it orients directly to the screen indicator dot which will be oriented towards the left of the ultrasound screen. Here we’re localizing the internal jugular vein using the short axis configuration. We’re coming in underneath the probe with a sheath needle at that 45-degree plane, pushing in underneath, and notice the ring down artifact coming in directly on top of that internal jugular vein telling us this is the correct puncture point. This video clip shows why a short axis orientation is an excellent starting point for cannulation of an internal jugular vein. Here we see the echogenic tip of the needle coming down and permeating the anterior wall of the vessel and we then note the echogenic tip of the needle squarely inside the lumen of the vessel.
And we can see how using the short axis orientation can guide us in a side-to-side orientation on the patient’s neck in terms of lateral needle orientation with regard to the surface down to the vessel lumen. When using the short axis orientation it’s important to remember the affect of probe slice on visualization of the needle tip. Here we see the probe position one proximally along the needle shaft and note in the schematic view towards the left we see the needle with the tip squarely inside the venous lumen. However, the ultrasound probe is positioned more proximally along the shaft of the needle and thus on the ultrasound view to the right all we visualize is the needle above the vessel even though the needle tip is squarely right within the vessel lumen. So we get a false determination of the tip of the needle. In order to accurately determine the location of the needle tip we need to move the probe more distally as we advance the needle into the patient’s neck along the course of the vessel.
Here we see the probe position more distally now in plane with the needle tip in the schematic view towards the left. And there we can see we can get an accurate determination of the location of the needle tip with regard to the venous lumen. We see the ultrasound view towards the right, and now we’ll be able to see the echogenic tip of the needle accurately positioned within the vessel lumen. A second pitfall that must be avoided when cannulating the internal jugular vein under ultrasound guidance is to make sure that the needle tip does not angle to the side of the vein during a cannulation attempt.
Even though we know the orientation of the vessel with regard to the skin, if we don’t orient the cannulating needle along the course of the vessel it can veer to the side of the vessel as shown in trajectory’s one and two here. Now if we know the course of the vessel we can accurately position the needle so that it goes along the course of the vessel following trajectory three into the venous lumen. The solution to avoiding this pitfall is to know the course of the vessel as it runs up and down the neck. We can do this in two ways, the first of which is to mark two points on the vessel using the short axis configuration. The needle would then enter at that distal mark and aim towards the proximal mark passing along the course of the internal jugular vein. We can effectively do the same thing by passing the probe in the long axis configuration and knowing how the needle should pass from the top of the neck down towards the chest. Here we use a simulation model to show the correct approach for a short axis cannulation of the internal jugular vein.
Notice here we have the probe in a side-to-side or short axis orientation and the needle coming in at a 45-degree angle underneath the probe. Now remember that we must move the probe distally to stay in plane with the needle tip as we advance it underneath the skin and into the internal jugular vein. And as we do that we notice that we’ve successfully cannulated the internal jugular vein as shown by the red flow of blood. And here we see a side orientation of the needle with regard to the probe. Here’s an actual cannulation of an internal jugular vein. Notice that we see the deflection of the anterior wall of the vessel as the needle pushes down on that wall followed by the appearance of the echogenic tip of the needle within the lumen of the vessel.
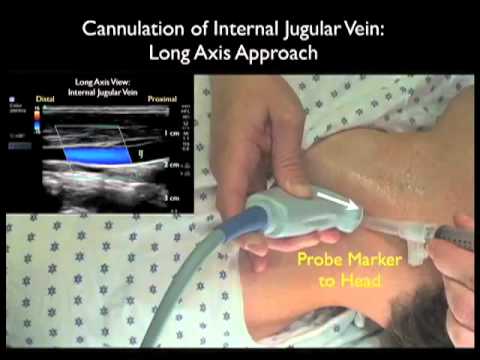
So let’s watch that again. Notice the deflection or pushing down of that anterior wall and then as the needle permeates that anterior wall we see the appearance of the echogenic tip of the needle within the vessel. Here’s a different patient receiving a central line, and notice in this clip we actually can visualize the echogenic needle coming from the surface and going all the way down through that anterior wall of the internal jugular vein to park directly into the lumen of the vessel. This video sequence shows cannulation of the internal jugular vein using the long axis trajectory. Notice we swivel the probe into the long axis orientation along the course of the internal jugular vein as it runs up and down the patient’s neck. By convention again, the probe marker should be oriented towards distally or towards us as we stand at the head of the bed. Notice the cannulating needle will come in at a 45-degree angle under the distal aspect of the probe.
Remembering that the distal aspect of the probe or the marker will orient towards the left of the ultrasound screen, we can then know to look towards the left of the screen for the cannulating needle coming down to the vessel. Here we’re performing cannulation of the internal jugular vein on a simulation model. Notice here the probe is oriented along the longitudinal or long axis course of the internal jugular vein with the marker dot distal or towards the patient’s head. Here we see the needle coming in at a 45-degree angle underneath the distal aspect of the probe. This will allow us to see the entire aspect of the needle as it travels down from the surface all the way down to the venous lumen and cannulates the internal jugular vein. Here we see the long axis approach and the needle coming in from left to right and we know here how the long axis orientation is excellent for seeing vertical needle depth. Note the needle coming through the anterior wall of the vessel and now the needle tip squarely within the vessel lumen.
Here we can see how the long axis orientation allows us to plan the optimal depth for the needle tip with regard to the venous lumen to squarely secure a cannulation attempt. Now this is in difference to the short axis orientation which was better for lateral needle orientation with regard to the vessel lumen. So using a combination of short and long axis orientations will allow you to see both lateral and vertical needle orientations with regard to the vessel lumen. Here’s a video clip in the long axis configuraiton emphasizing the fact that the long axis view is great for determining the needle depth. And here we see a needle coming in from left to right and notice how we can visualize the needle tip smack within the vessel lumen. Here’s another long axis clip of a patient who’s receiving a central venous catheter and we see the catheter coming in from left to right. Notice here the needle tip deflects the anterior wall of the vessel pushing it down so that it almost meets the posterior wall. Thus the needle could easily pass through both walls of the vessel.
Using the long axis technique one can best adjust the needle tip depth and avoid puncturing the back wall of the vessel. Here’s another great use of the long axis technique. Again, we’re confirming that the needle tip is located within the vessel lumen and now we can watch as the guidewire passes through the tip of the needle and moves down inferiorly down the patient’s internal jugular vein. This is a great way of confirming that the guidewire is safely parked within the lumen of the vessel before threading the catheter. Let’s end this module with a possible pitfall that can be avoided by first looking with ultrasound. Here we have a patient who’s had a prior central line and we notice a thrombosed internal jugular vein with echogenic material on top of the carotid artery. When we push down with the probe the internal jugular vein failed to compress. In this patient it would be best to look for an alternative area for puncture of a central line. In conclusion, thanks for tuning in for part two of Ultrasound Guided Central Venous Access.
Using ultrasound for dynamic real time guidance of the needle into the internal jugular vein can potentially decrease the mechanical complications of the cannulation procedure making the procedure a safer one for our patients. We can employ a combination of both the short and long axis views of the internal jugular vein for optimal results for a cannulation attempt. So I hope you’ll consider ultrasound during your next central line placement and I hope to see you back as Soundbytes continues..