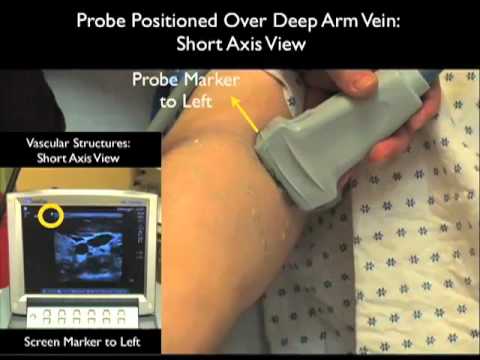
Hello my name is Phil Pereira and I’m the emergency ultrasound coordinator at the New York Presbyterian Hospital in New York City and welcome to soundbites cases in today’s module we’ll look at the use of bedside ultrasound to help us place peripheral IVs specifically we’ll look at ultrasound guidance for cannulation of deep arm veins ultrasound can allow us to cannulate non palpable arm veins which have traditionally been off-limits using traditional palpation techniques thus we can avoid central venous access and those with poor traditional access in whom we can get a peripheral IV using ultrasound ultrasound allows precise determination of vascular Anatomy prior to a puncture attempt and there’s been a number of research studies that have shown a decrease in number of temps and time to successful cannulation using ultrasound here’s an illustration show in the anatomy of the arm veins a long axis view to the right and a short axis view to the left note here on the long axis view the brachial artery running down the arm and adjacent to the brachial artery we can see here the brachial vein notice that the brachial vein is composed of two major veins the basilic vein which is the larger vein located more superficially and medially and the deep brachial veins found adjacent to the brachial artery in a deeper and more lateral position on the arm let’s look at the short axis view and here we can see well the brachial complex the brachial artery surrounded by two deep brachial veins here and the more superficial and medial basilic vein which is really the preferred target for a deep ultrasound guided IV note the median nerve lying on top of the deep brachial vein which must be avoided during a puncture attempt on this structure here’s a picture showing the surface anatomy of the veins of the upper arm notice here the basilic vein in a more medial position on the patient’s arm and the brachial vein complex which would be located more laterally on the patient’s arm and these are the positions over which we should place the probe in order to inspect the veins of the upper arm here are the orientations in which we can place the probe to inspect a vein for vascular line placement we see the short axis view to the left and notice that we’re placing the probe perpendicular to the vein and note that the resulting ultrasound image of the vein will appear as a circle as the vascular structure the vein here will be cut and on note the long axis view to the right in which the probe is placed in a longitudinal manner along the course of the vein and note the resulting image of the vein which appears as a tubular structure on the ultrasound screen here’s the high frequency linear type of a probe that we’ll be using for vascular access and that line on the side is the indicator marker on the probe here’s the high frequency linear type of a probe placed on the patient’s upper arm notice here that it’s placed in a short axis or side-to-side configuration here we have the probe positioned over the more medial basilic vein notice also that the probe marker here is towards our left as we stand in front of the patient and the reason for that is note on the screen that the indicator dot is also located here to the left therefore left on the probe lines up with left on the screen so now that we know the proper configuration of the probe in the short axis view let’s take a look at a typical appearance of vascular structures cut and on here we have the probe positioned over the brachial complex and we see here the central brachial artery surrounded by two deep brachial veins so let’s put that into video play here and notice with compression that both of the veins compress completely helping us differentiate venous structures from the artery in the center and notice that the artery has less distensible walls and stays open even as we can press down with the probe we can further differentiate vascular structures by applying color doppler flow notice here as we apply Doppler that we see arterial pulsations in the central brachial artery however notice the absence here of any flow within the deep brachial veins and that’s because of the sluggish flow within those two vascular structures as compared to the brisk arterial flow in the central brachial artery so putting it all together using doppler flow and applying compression notice here again that the brachial artery in the center stays open and has brisk arterial pulsations and notice that the two flanking deep brachial veins can press completely and have a lack of vascular flow with Doppler interrogate now let’s look at a video clip that shows all of the veins of the upper arm in relation to one another medial is to the right and laterals to the left here we see the larger and more superficial basilic vein more medial and superficial to the brachial complex which is located here to the left and note the central brachial artery and to flanking deep brachial veins in this patient the basilic vein would be the preferred target for placement of a deep arm IV here’s a different patient again we’re looking at the relation of the basilic vein to the brachial complex medial is to the left and laterals to the right we see here the superficial basilic vein and the deeper brachial complex notice we apply pressure that all of the venous structures the basilic vein and the deep brachial veins all compress completely helping us differentiate Venus from arterial vascular structures here we’re applying Doppler flow and again we can differentiate the brachial artery by his pulsations consistent with arterial flow and note the lack of significant flow within the venous structures specifically the basilic vein here’s the high-frequency linear type of a probe in a longitudinal or long axis orientation over the patient’s upper arm here it’s located over the more medial basilic vein in this orientation we have the probe marker going distally and this helps us line up the probe with regard to the screen notice the screen indicator dot here is located towards the left therefore distal on the screen would be over towards the left and proximal on the screen would be located over towards the right here’s a typical appearance of a venous structure cut in a longitudinal or long axis orientation notice here that the vein has more of a tubular appearance on the screen and that the flow of blood here is from the left which is distal on the vein towards the right which is proximal on the vein looking in long access gives complementary information about the vein so thanks for tuning in to part 1 of ultrasound-guided peripheral IV insertion as we mentioned ultrasound can be very helpful in identifying deeper and non palpable veins that can still allow placement of an intravenous catheter will be looking at the vein in both short and long axis views to determine the anatomy prior to a puncture attempt and now that we have a good sense in terms of how to look at a vein in both short and long axis we’re ready to move directly to learning how to cannulate the vein using ultrasound so I look forward to seeing you in part two of peripheral venous access
Peripheral Venous Access Under Ultrasound Guidance – Part 1 – SonoSite, Inc.